Table Of Content

Quick Guide

Video Guides

Getting Started
UI Settings

Data Tables

UI Layout

Widget Panels

F. w. Preview

Designer

Variation Actor

Scene Settings

Blueprints

Gamemode

VR projects

Connect BP

Cost Tracking

Multi-Unit-Prj

Google Data Sheets

FAQ + TIPS
Fix Known Bugs

Version History
UI3 Frequently Asked Questions
FAQ, Tips and tricks, or answers for frequent questions are here. Known bugs are on the next page.
All Unreal 5 versions of ArchViz UI3 are more or less the same until end of 2024.
From now on only the 5.3 or later versions will be updated. Unreal is in development and new features are added to new versions. This will help to take advantage of the new features.
Content:
Some Materials are not displayed correctly (5.5)
Can I hide the prices everywhere?
No option for 5.3 and 5.4 versions
Player Facing the Wrong Way At Start
I cannot select an object in edit mode
Some Materials are not displayed correctly (5.5)
Problem
Some Materials may be white and others may be black after migrating the UI3 project to Unreal Engine 5.5 or after creating a new project in this version.
Cause
Some sources report this may be caused by the Oodle plug-in.
It appears as if some textures don't have the correct compression settings.
Solution
I had some luck by simply updating the project settings and then restarting the project.
Disabling the Oodle plugin may work as well.
I also had success opening and resaving the problematic textures.

Can I hide the prices everywhere?
Edit Mode
Use the tick box Show Prices (Details) to toggle the visibility of the price set in the Details array of the Variation Actor. Use the Select menu of the editor to select all variation actors.
Designer
You can now use the tick box Show Prices in the Designer Data array in the Info Map to hide prices for the selected Designer.
The link below offers a download of the updated files if you're unable to update the entire UI3. Unzip and copy the UI folder over your project UI folder to overwrite all widgets and blueprints. Make a backup copy before doing so.

No option for 5.3 and 5.4 versions
There may only be options to create new projects in versions 5.0 to 5.2. This seems to be a glitch in the Epic Games Launcher.Remove Local Content and then close and reopen the Games Launcher.
This should fix the issue, and all options should now be in the list

Image Ghosting
Problem:The image has a ghosting translucent double in certain angles. Seems to be performance related.
Cause:
This is most likely caused by bad project settings. The project has travelled through version updates and at one point some project settings were added that is causing this issue.
Solution:
Rename the Config folder to Config.old then open the project.
Download the config folder from the link below and extract it to your project. This should fix the issue. Any special project settings will be lost and have to be redone.

Player Facing the Wrong Way At Start
The player may start facing random rotations when the App starts. You can fix this by adding a BP_UI3Location near the start point and then use the name of that start point as the Start Location Name in the Info Map in the Project Settings Section.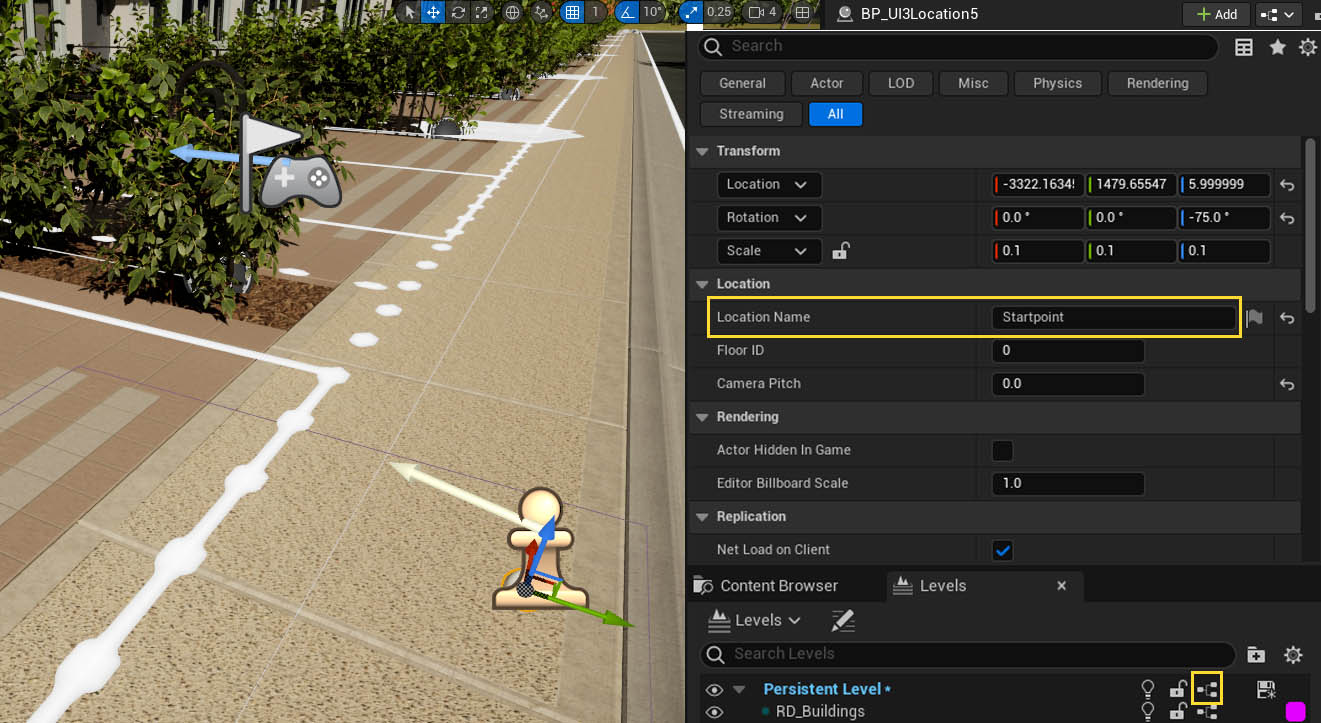
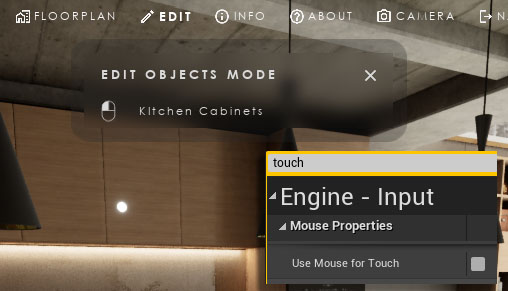
I cannot select an object in edit mode
This has been fixed in the latest update.Problem: You cannot select an object in edit mode. The name changes when you hover over the object, but nothing happens if you select it.
Solution: Open the project settings and search for Touch in the search bar on top of the window. Untick the tick box where it says: Use Mouse for Touch.
If this doesn't help then try to update the UI3 or check if a large collision is in front of the objects.
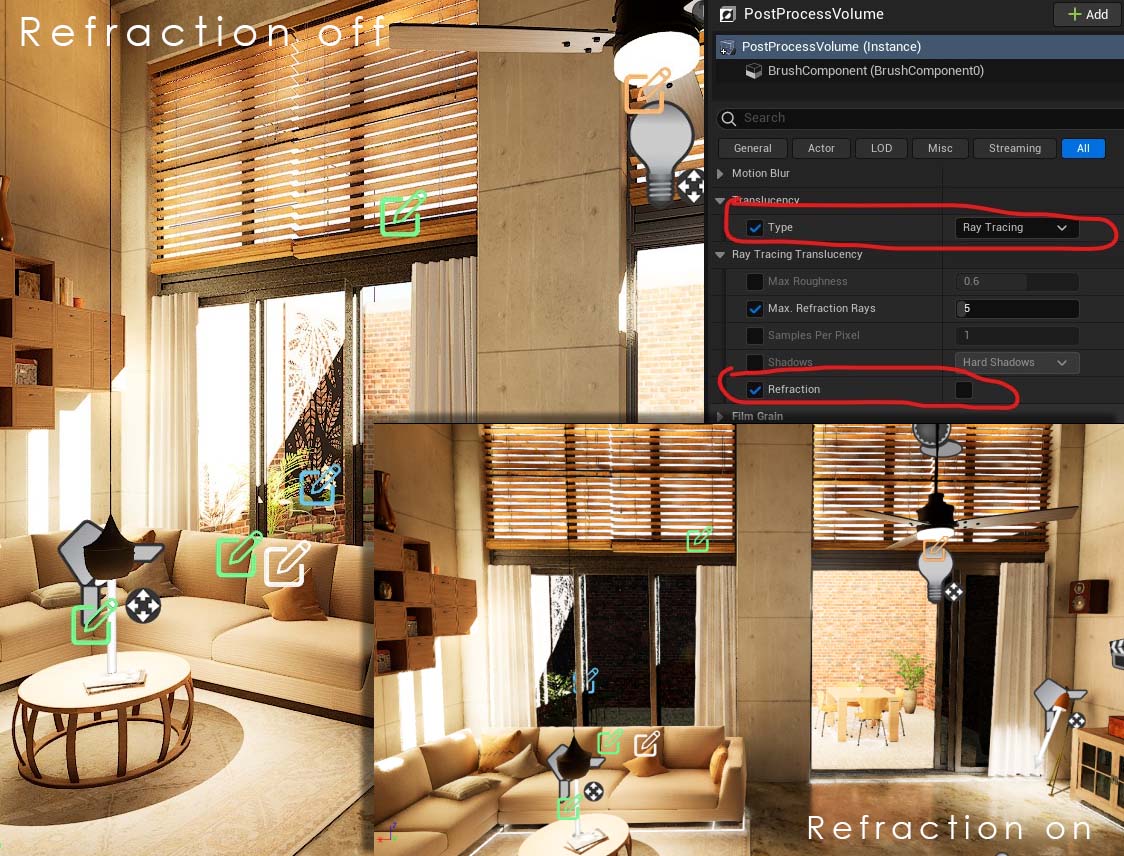
Looking Through Windows Looks Wrong.
This can happen in any of the Unreal 5 versions. Lumen is creating ambient occlusion and shadows. But it doesn't really care about translucency. The demo project uses ray traced translucency for this reason. This improves the Reflections on the glass panes as well.Part of translucency is Refraction. Turn it off to fix overly dark shadows behind glass. As seen in the image. You can also try to tweak refraction in the glass material. (There might be other places to look for it, like the light sources, or the project and world settings).
This topic has many aspects and it is constantly changing as well. I can only direct you to Google to find out what works best for you.
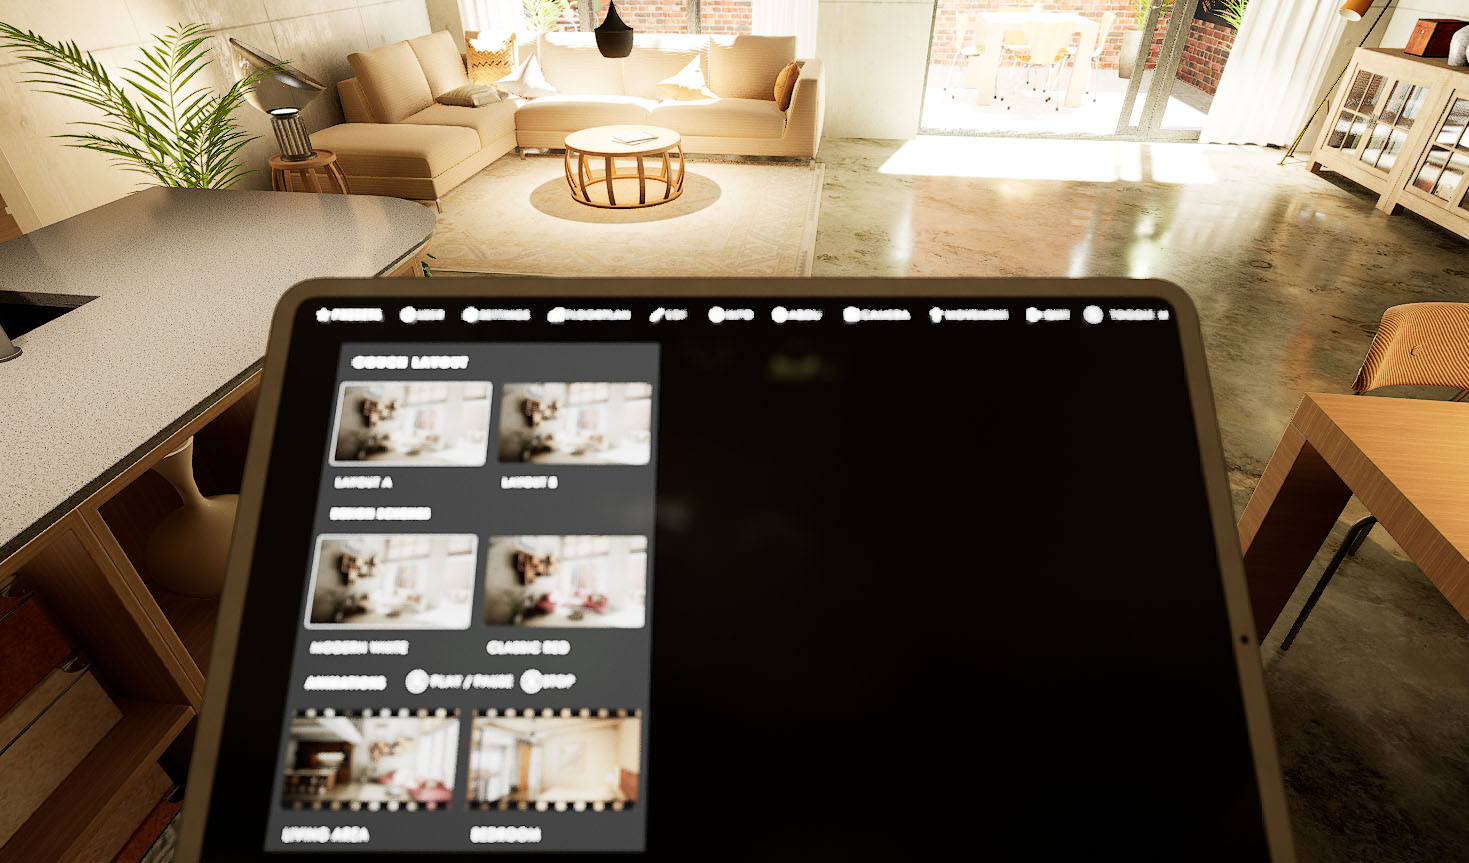
VR Tablet Is Blurry
Sorry I'm aware of it. I submitted an update with an example level to show how to set the UI up for VR.- The update fixes the interface not responding
- Set the default aperture to 32 or it will be blurry because the tablet is out of focus. (Settings - Cinematic Camera)
- use colour scheme id 3 as a start
- increase icon and text sizes
Using VR, Touch or Gamepads
You need to set the Game Mode in the World Settings of your scene. The World settings are part of the 'persistent' level. If You only have one level, then this level is the persistent level.UI3 can be used with
- Mouse and Keyboard controls on a PC
- A gamepad on a PC
- Touch controls with or without Pixel Streaming
- VR projects with VIVE or Oculus Rift controllers or a gamepad.
Read on how to use Game Modes for these different uses.

Pixel Streaming
With pixel streaming the app can be used on tablets and other devices that don't have the power to render the scene on a web browser. Use the Touch game mode to run the app on a touch device.Follow the steps in the link below to enable pixel streaming for your project. It's easy to do locally in your own network. Some additional steps are needed to stream over the internet.
There are cloud services available where you can stream your unreal engine app. Search for them on Google as they tend to come and go.

Packaging Fails
Sometimes Unreal didn't install some additional software needed. Check that you have the software when the packaging fails early on:
- Windows SDK
- Visual Studio (free community version)
- Net framework (if everything else doesn't help)
Check the output log if the packaging fails later on. Scroll down to the very end and then look for any red messages above, like a missing structure here:
[2023.06.08...]LogProperty: Error: FStructProperty::Serialize.../UI/Widgets/UI3_CustomButton.UI3_CustomBu tton_C: Color Set Used'. Unknown structure.
Scroll down for a few more solutions for failed packaging.

Packaging Tips
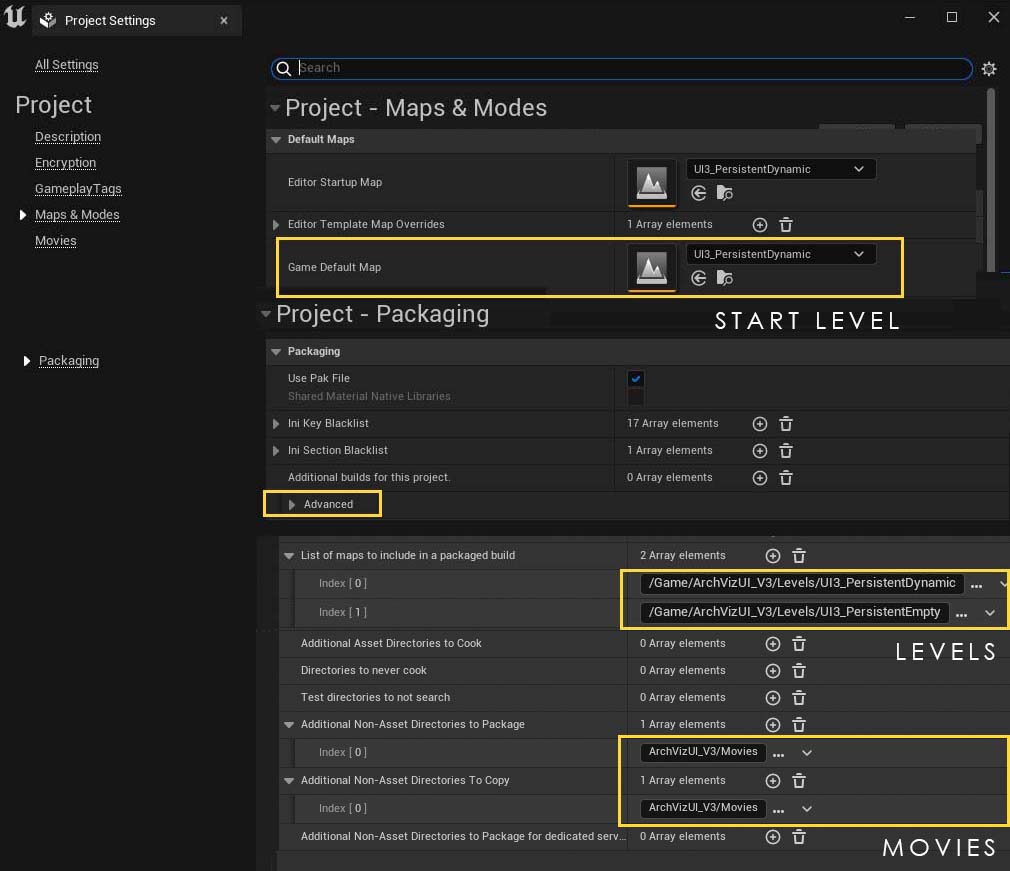
Packaging will create an app that can be run by users that do not have Unreal installed. You find it in the File menu (Unreal 4) or above the viewport (Unreal 5).First make a few changes to the Project Settings
- Set the Default Game Map In the Maps and Modes section. This needs to be the main (persistent) level of your scene.
- Add the levels that need to be cooked in the Packaging - Advanced - List of Maps to include... array. You don't need to add any sub levels that are loaded from your main levels to the list. But you need to add any other levels if the user can travel to them.
- Add your movie directory there as well. I put them in both arrays Additional Non-Asset Directories ... . It's probably not necessary that way.
NOTE: Leaving the list of maps empty can increase your package size significantly. In that case everything in the project will be packaged.
Using GPU Lightmass
Lumen is the best way to light your scene in Unreal 5.GPU Lightmass can be used to bake lighting in your scene if you want to use raytracing instead of Lumen. Follow all the steps suggested in the documentation (link below) to use it in your project. UI3 will not interfere with lighting in the scene. Scenarios are working with GPU LM.
Dynamic objects (mesh variations) need some direct light to look decent (not black). This can be the skylight. Reflection actors need to be rebuild manually after each GPU Lightmass build. Black variation actors can be caused by missing reflection actors. Place one with low radius next to the black asset and rebuild lighting and reflections.

Main Menu Compile Error
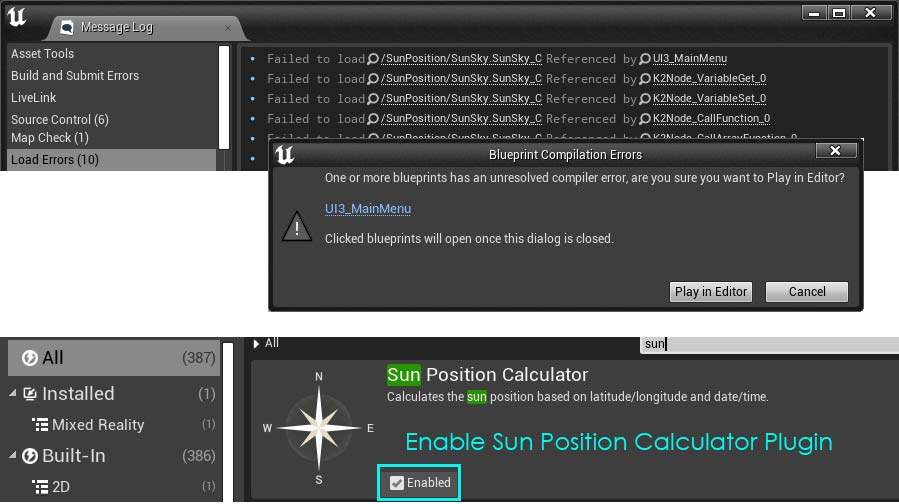
Symptoms: You'll get a few load errors. The game won't 'Play' in editor and give you a message that there are blueprint errors in the 'Main Menu'.Solution: This is caused by the Sun Position Calculator or the OpenXR plugin not being enabled. Please enable them even if you do not intend to use them. You have to restart the editor for the Plug-In to be enabled.
Do not save the Main Menu Widget before restarting. It should be fine after the restart. If you did save then re-migrate the MainMenu widget from the UI3 Demo Project and make sure to override when asked.
Please replace the Enable HMD with the appropriate node from the plugin that is required for your headset if necessary.

 Top of page
 More info in a Forum Thread
 UI3 Game Modes