Table Of Content

New in 2026

Quick Guide

Video Guides

Getting Started

UI Layout

Var Actor

Edit Scene

Designer

Other Features

Modes

Blueprints

Cost Tracking

Multi-Unit-Prj

Google Data Sheets

FAQ

Fix Bugs

Version History
UI3 Input Controls & Game Modes
The Game Mode defines the type of game (Touch, VR) for the scene and what input devices are used to control it.
Some of the content is slightly different between versions.
Content:
World Settings
The Game Mode in Unreal defines which Character (Pawn) and Input Controller will be used in your project.The Game Mode is set in the World Properties or your main (persistent) level. Sub-levels world properties are ignored.
UI3 has 4 Game Modes to choose from:
- SDotUI3_GameModeKeyboard for keyboard and mouse support
- SDotUI3_GameModeTouch for touch controls
- SDotUI3_GameModeGamepad for XBOX Gamepad support
- SDotUI3_GameModeVR for VR headsets with a controller or gamepad.

Multiple Input Controls
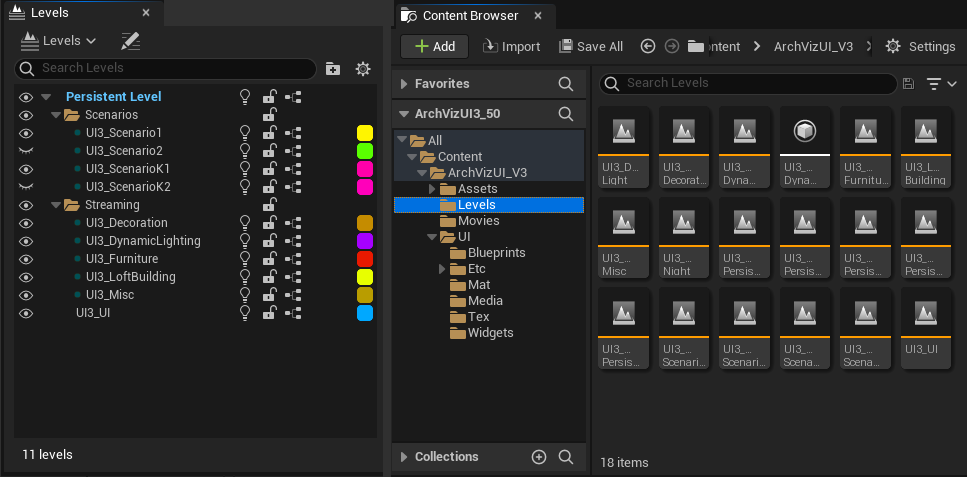
The persistent level is where the Game Mode is set and the Game Mode defines the Input Method.Create a Persistent level for each input method. This level will only contain a few actors like the Info Map and a player start.
There are persistent levels for each input method in the UI3 demo project:
- UI3_PersistentDynamic - default, keyboard
- UI3_PersistentController - gamepad version
- UI3_PersistentVR - VR headset with tablet
- UI3_PersistentTouch - touch controls
All other assets are split into sub levels. The same sub levels are attached to the persistent levels and changes made in one of the sub levels applies to all scenes.
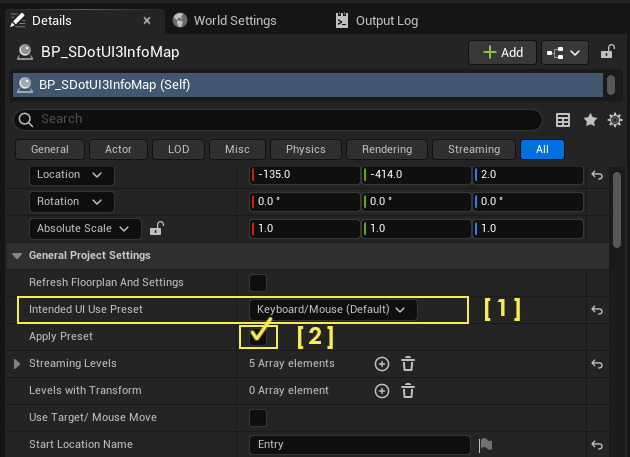
Presets for the Game Modes
UI3 has good settings for keyboard and mouse controls by default. A preset can be applied in the Info Map's General Settings as a starting point if using another input method.- Select the Input Method
- Click Apply Preset
The tick box will immediately unselect itself to unlock the preset variables for changes. Read the section for each input method to see which variables are recommended to be changed.
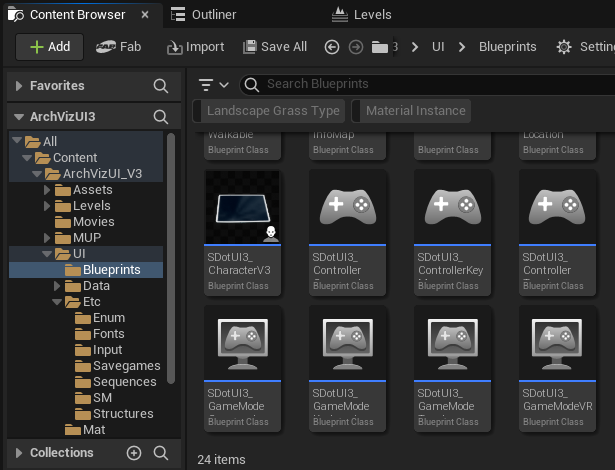
SDotUI3_CharacterV3
This blueprint is part of all game modes. It contains many of the most important nodes. It also contains the movement related nodes.
SDotUI3_ControllerType
These blueprints contain the nodes for interacting with objects in the scene.
SDotUI3_GameModeType
These blueprints define which character and input controller are used in the game mode and other things.
Game Mode Keyboard
SDotUI3_GameModeKeyboardGame Mode for keyboard and mouse controls. It uses
- SDotUI3_CharacterV3
- SDotUI3_ControllerKeyMouse
The game mode contains a node from the OpenXR plugin to disable the VR headset.

The Info Map has default settings that work well with this game mode.

Game Mode Touch
SDotUI3_GameModeTouchUse this Game Mode for touch screen devices. Also use it if you want to Pixel Stream onto a touch screen device. It uses
- SDotUI3_CharacterV3
- SDotUI3_ControllerTouch
The game mode contains a node from the OpenXR plugin to disable the VR headset.
Touch can be simulated during development with Project Settings -> Input -> Use Mouse For Touch. The simulation is buggy in recent Unreal Engine versions, but touch works fine on actual touch screens.
Note that Use Mouse For Touch will block the Mouse input in keyboard/mouse game mode.

Settings in the Info Map blueprint:
| Info Map -> Project Settings | |
| Use Mouse Move | Will be enabled automatically |
| UI Design | |
| Button Text Size | Main menu button size: 20 - increase the size from the default |
| Scene Presets | |
| > advanced display | |
| Save Slot Size | 80 x 80 - Increase the size for touch screen controls |
| Floorplan | |
| > advanced display | |
| Dot Size | 32 - Increase the size of the marker |
| Info and Help | |
| > About Project and Help | The control scheme is used as the first Info Media |
| Help Image | Use the image that shows the touch control
scheme from the Tex folder
In previous versions the help image was set as index [0] of the Info Media Array. |

Game Mode Gamepad
SDotUI3_GameModeGamepadUse this Game Mode with the XBox gamepad, Steam/VIVE, and Oculus/Quest controller.
This Game Mode uses the
- SDotUI3_CharacterV3
- SDotUI3_ControllerGamepad.
The game mode contains a node from the OpenXR plugin to toggle the VR headset.

Settings in the Info Map blueprint:
| Project Settings | |
| Use Mouse Move | If true a target circle will be displayed on the floor. Once the move button (depends on the controller used) is clicked the player will slide to the circles position. |
| UI Design | |
| > advanced display | |
| Icon A | Lets you replace the default gamepad face button down icon. This is used to select menu items (like enter). |
| Icon B | Lets you replace the default gamepad face button right icon. This is used to toggle the menu visibility and move sliders to the right. |
| Icon X | Lets you replace the default gamepad face button left icon. This is used to cancel and move sliders to the left. |
| Info and Help | |
| Info Media > 0 | By default the control scheme is used as the first Info Media |
| Image | Replace the current image with the image that shows the control scheme of the connected controller. There are images for Gamepad, VIVE and Oculus Rift controller available. |
How to use a different controller with the user interface is explained at the end of this page.

Select may be either [SPACE] or [ENTER] in earlier versions.
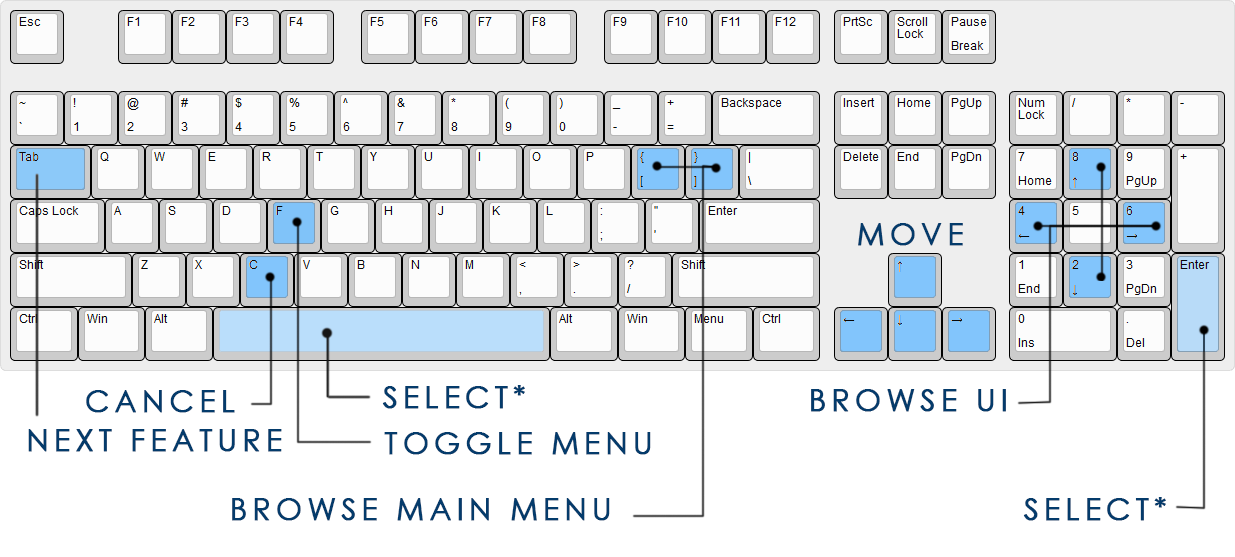
Game Mode VR
SDotUI3_GameModeVRUse this Game Mode for VR scenes. It enables the 3D interface on the virtual tablet.
- SDotUI3_CharacterV3
- SDotUI3_ControllerGamepad
Grabbing or pointing at objects with your hands may not work with UI3.

Enhanced Input Settings
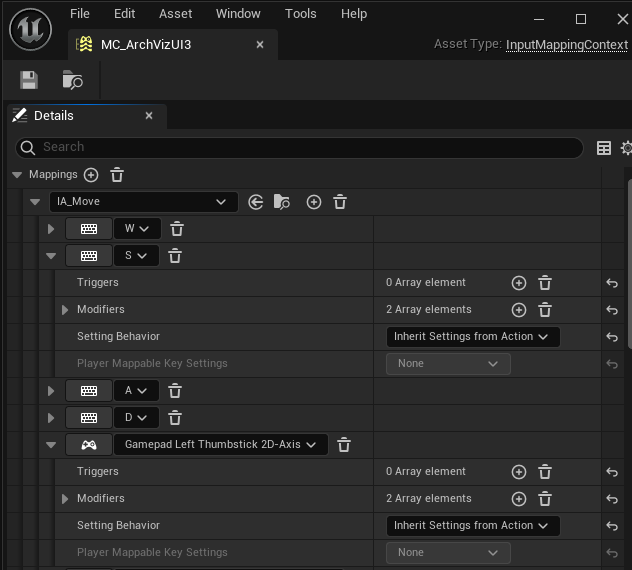
The file DefaultInput.ini has become obsolete. Input Actions are now defined as assets saved in the folder ArchVizUI_V3/UI/Etc/Input.The actual input keys and buttons are assigned in the file MC_ArchVizUI3

examples of how it works:
Keyboard Key S
This key controls the backwards movement. Movement is two- dimensional and can be X or Y, or forward/backward and Left/Right. You'll need 2 modifiers for this control key
- Swizzle Input Axis Values: redirects default X to direction Y which is forward/backward.
- Negate will invert (negate) the value to move backwards.
Gamepad Left Stick
The lift stick is a 2 dimensional input. There are another 2 modifiers used for this type of input:
- Dead Zone is a limiter that stops input of low values. Most controllers are not perfectly calibrated and send low values when they are idle.
- Scalar is a simple multiplier that increases the value of the stick 50 times for X and Y axis.
A simple Button, like the Select Button doesn't need any modifiers.
 Top of page
 Using VR with UI3