Pages in Documentation

Customize

Overview

Swap Actor

Settings

Swap Actor

UI3 Connect

UI3 VR projects

Customize

Overview

UI3 Scene Settings

Spl. T. Versions

Placement

Mesh Def.

Segments

Books V2

UI3 Vers History

UI3 Preview Ft.

UI3 Overview

UI3 Bugs

UI3 Data Entry

UI3 Design

3 Spline Tools

Doors FAQ

[old] Doors UE5

Step by Step

Tips & FAQ

Reference

UI3 Input Controls

UI3 FAQ + TIPS

Books V1

Doors UE4 (V1)

Change list

3.1 Bugs Fixes
![[2 A] Generic Meshes On Spline Blueprint ../images/architecture/2020/spline/thumbs/01.jpg](../images/architecture/2020/spline/thumbs/01.jpg)
2A Generic BP
![[2 B] Generic Spline Blueprint Examples ../images/architecture/2021/splexamples/thumbs/01.jpg](../images/architecture/2021/splexamples/thumbs/01.jpg)
2B Gen Examples
![[1] Railings Clone Blueprint Documentation ../images/architecture/2020/railings/thumbs/01.jpg](../images/architecture/2020/railings/thumbs/01.jpg)
1 Railings

UI 1 - Part 1

UI 1

Ui 1 - Part 2

1 Overview

2 UI Features

3 Get Started

4 Info Map

5 BP Actors

6 Manage Clients

7 FAQ

8 Tutorials

UI3 Overview

UI3 Get Started

3.1 Info Map

UI3 Edit & Info

UI3 Other BPs
UI3 Edit And Object Info Modes
The Variation Actor is the connection between the UI3 and the objects that should be interactive in your scene and can
- change meshes and or their materials
- interact with any other blueprint using a blueprint interface
The Object Info can display information and the price of an object.
Content:
Video Tutorials
Three parts of the Video Tutorials are about the use of the Variation Actor and the UI Features related to it.- Part 4 - Design Schemes
- Part 5 - Variation Groups
- Part 6 - Object Interaction
This video is part 4. Click on the link below to watch the entire playlist.
Variation Icon Colours
The blueprint actor SDotUI3_Variations lives in the UI/Blueprints folder. The icon colour will change depending on what the actor is set to do:- Green - Material variations.
- Blue - Mesh and material variations.
- Dark Green - Child of another actor
- White - Not part of the Design Schemes
- Orange - Parent only, calling interface
- Red - Indicates a possible wrong setting

Mesh with index [0] will have the material, name, and price with index [0]. And so on.
You have to enter a mesh or material for every array index as soon as you add one element to that array. Otherwise, the UI feature might not work proper.

Variation Materials
| > Variation Materials | |
| > Materials | Add an array element for each set of material variations for the specified ID. |
| Material ID | The material ID on the mesh. There might only be one material (ID 0). |
| > Material Variations | Add an array element for each material variation. |
| ID 0, 1, 2 ... | Add a material for each variation. |
| Note: | The mesh might have multiple materials (IDs). Add a Material Variation array for each material index (ID) you want to change. Every Material ID needs to have the same amount of Variations set up for it. Duplicate materials if necessary. |
| Original Material | Contains the original material of ID [0] applied to the mesh before any variations where applied. |
| > advanced display | |
| Default Material | Deprecated from 2024- 06.1 on. Now called Original Material. |

Video: Mesh Variations
Part 6 of the video tutorial has an example on how to use the Variation Blueprint to change static meshes.Another example explains how to set up the Variation Blueprint to trigger a spot light on and off.
Variation Meshes
| > Variation Meshes | |
| Enable Mesh Variations | Will change mesh variations if enabled |
| Show Source Mesh | Deprecated from 2024-06.1 on. Show or hide the original source mesh. |
| > Meshes | add an array element for each mesh variation. |
| ID 0, 1, 2 ... | The meshes per variation ID. |
| Note: | Put any materials different from the meshes default material into the Materials array above with the same ID as the mesh variation. You need to enter materials for all mesh variations if you change the material of one of the variations. The mesh might get the wrong material assigned otherwise. |
| > Mesh Transforms | Add an array element for each mesh variation that needs to be transformed to match the position of the source mesh. |
| ID 0, 1, 2 ... | Optional transform for the mesh variation with the same ID. Leave any IDs to default if the mesh doesn't need to transform. |
| Original Mesh | Contains the original mesh before any variation was applied. |
| > advanced display | |
| Default Mesh | Deprecated from 2024-06.1 on. Now called Original Mesh. |

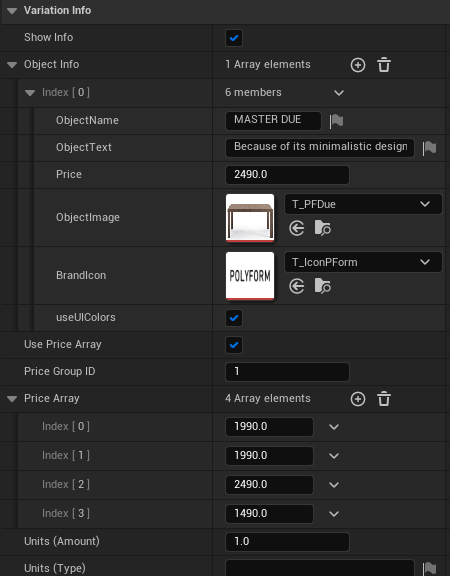
Variation Info
| > Variation Info | |
| Show Info | Weather to show the Object Info section above the variation list. |
| > Object Info | add an array element for each variation. Use only the first ID [0] if all variations will have the same Info. More in the Object Info section |
| Note: | Leaving the price in the Object Info 0.0 will hide it. The currency symbol is taken from the Info Map. Prices in the Price Array will override the price in the Object info for cost calculations. |
| Use Price Array | Weather to use prices from the Price
Array instead of the Object Info. The price will be displayed
next to the variation name. |
| Price Group ID | The ID of the Price Group that can be set in the Price Group array in the Info Map. |
| > Price Array | Add an array element for each mesh variation |
| ID 0, 1, 2 ... | Add the unit cost for each variation ID (optional) |
| Units (Amount) | The amount of objects (4 chairs) or the size of the object (25 m2) |
| Units (Type) | (optional) the unit type like m2 or square inches |

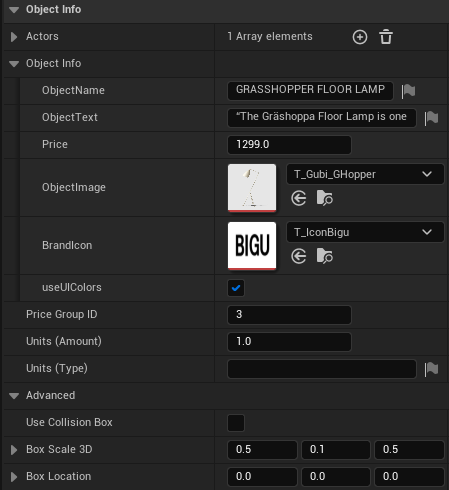
| > Object Info | |
| Actors | Use the eye dropper to connect mesh actor(s) to the blueprint |
| > Object Info | This contains the object information |
| Object Name | A name for the object, preferable the exact item name from the manufacturer |
| Object Text | A description of the item |
| Object Image | Use a simple texture of an image. Set the compression type to UI (no compression) |
| Brand Icon | Use a simple texture of an image of the brand icon. Set the compression type to UI. |
| use UI Colors | for the brand icon. A black and white texture is required for this to work. |
| Price Group ID | (optional) Set the price group this item has in the estimated cost list. |
| Units (Amount) | The amount of objects (4 chairs) or the size of the object (25 m2) |
| Units (Type) | (optional) the unit type like m2 or square inches |
| > advanced display | |
| use Collision Box | tick to use a collision box instead of connecting an actor. Useful for a mesh cluster or any other object that can't be connected otherwise. |
| Box Scale 3D | the size scale of the box |
| Box Location | the offset from the Info Actor icon. |

Restore Original Meshes
Obsolete from versions 2024-6.1
You can recover the original mesh if you decide to remove the Variation Actor from the scene. The proper way would be to:
1) Select the tick box to 'Show Source Mesh'.
2) Set the 'Current Variation ID' to 0.
3) Empty the Mesh Variations array (click on bin icon)
4) Remove the Variation blueprint from the scene.
Press G on the keyboard to toggle game mode on. Search for 'Hidden in Game' in their details panel and deactivate it if they disappear when game mode is on.

Interact With Other Blueprints
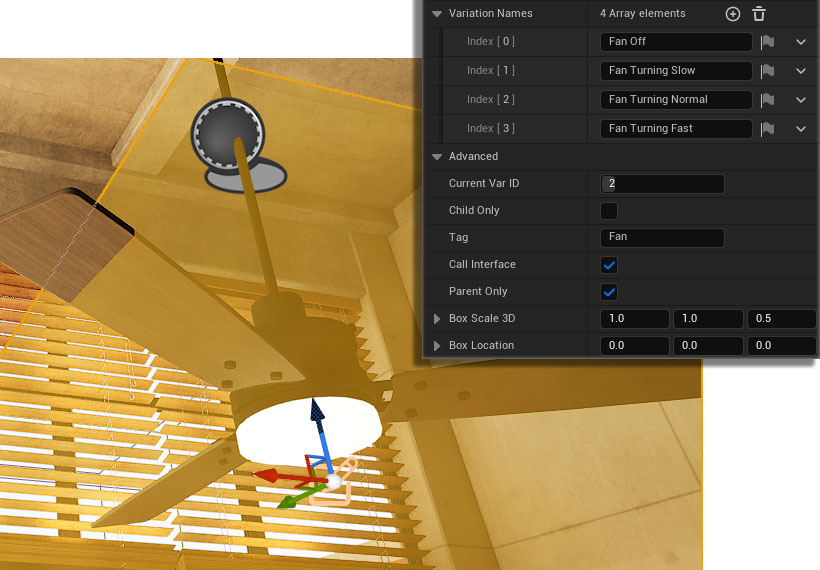
The Variation Actor can trigger other actors. The video tutorial part 6 has an example of toggling a light on or off near the end.Another example is the Ceiling Fan. A 'Parent Only' Variation Actor sends the speed setting via the BPI_UI3_Interaction interface to the Fan blueprint. The Fan blueprint then changes the Fan speed.
| > Variation Settings | |
| Actors | Leave empty. Only Variation Names are required |
| Variation Names | Add text here to Identify the Action or Variation |
| Index [0] | Fan Off |
| Index [1] | Fan Turning Slow |
| ... | |
| > advanced display | |
| Tag | 'Fan' - use the tag in both the Variation Actor and your custom blueprint. |
| Call Interface | tick - to send a message when this actor will be used |
| Parent Only | tick - there are no other actors that are changed in the scene |
| Box Scale 3D | scales the yellow collision box that lets you select the variation actor |
| Box Location | lets you offset the collision box. |


 Top of page
 Video Tutorial Play List