Pages in Documentation

Settings

UI3 Overview

[old] Doors UE5

Quick Start

Swap Actor

Custom Assets

System Drawings

Step by Step

Tips & FAQ

Settings

Multi-Unit-Prj

Google Data Sheets

Data Tables

Video Guides

Quick Videos

Designer

Cost Tracking

Widget Panels

Quick Guide
Scene Settings

Connect BP

VR projects

Version History

F. w. Preview
Fix Known Bugs
UI Settings

UI Layout

Gamemode

FAQ + TIPS

V4 Functions 2

V4 Functions P1

V4 Quick Guide

Ver History

V3 Placements

V3 Mesh Def.

V3 Segments

V3 Quick Start

Books V2

Books V1
Customize
Quick Guide

Swap Actor

FAQ + TIPS

Doors UE4 (V1)

3.1 Bugs Fixes

Ver History
![[2 A] Generic Meshes On Spline Blueprint ../images/architecture/0023/v2-generic/thumbs/01.jpg](../images/architecture/0023/v2-generic/thumbs/01.jpg)
V2 Generic BP
![[2 B] Generic Spline Blueprint Examples ../images/architecture/0023/v2-examples/thumbs/01.jpg](../images/architecture/0023/v2-examples/thumbs/01.jpg)
V2 Examples
![[1] Railings Clone Blueprint Documentation ../images/architecture/0023/v1/thumbs/01.jpg](../images/architecture/0023/v1/thumbs/01.jpg)
V1 Railings Fences

UI 1 - Part 1

UI 1

Ui 1 - Part 2

1 Overview

UI2 Features

UI2 Get Started

UI2 Info Map

UI2 BP Actors

UI2 User Manager

UI2 FAQ

UI2 Tutorials

UI3 Overview

Getting Started

3.1 Info Map

Variation Actor

Blueprints
Kitchen Builder - Settings Reference
Details and background information for Modular Kitchen Builder.
Every Setting should have a pop-up explanation when you hover over its name.
Available on the marketplace.Content:
Example Video
A quick video how to create a kitchen with this product.It's a bit out of date and will be replace sooner or later with a new one. This version of the kitchen has less options. It still shows how to build a kitchen layout from the Module Array.
Blueprint Actor
Place the BP_KitchenBuilder in your level. Open the details panel and expand Modules. Add at least one module to be able to rotate the actor and put it in the starting position.The origin is located on the left side of the kitchen cabinets at the back wall.
Black numbers identify the ID of the modules. They only appear in the editor and not at run-time, or in game mode. - Press [G] to toggle game mode.

Kitchen Cabinet Sizes
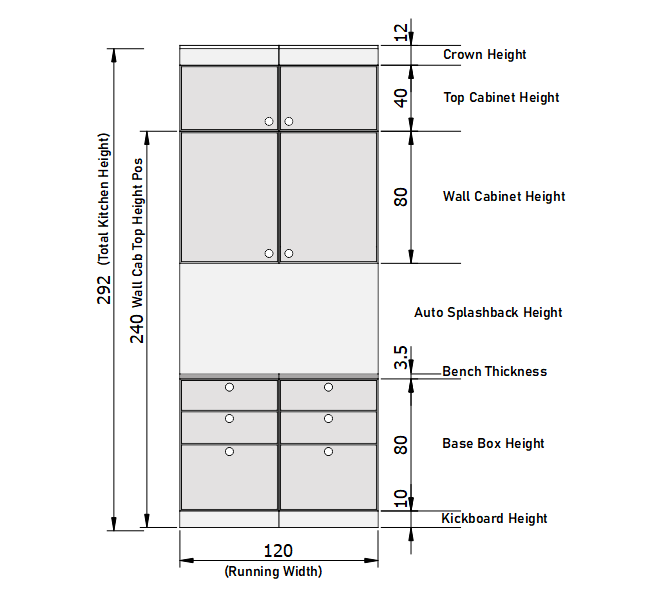
All heights are set in metric Unreal units. Wall Box Top Height defines the overall height of the kitchen cabinets. Top cabinets or crown are optional. The distance between the bench and the wall cabinet depends on all other heights.Running Width displays the width of all modules excluding any bench overhangs or corner modules.
Total Kitchen Height is a result of all other heights.
The depth of the cabinets can be set but is not recommended. Most kitchen in the world are 60cm deep plus the front panels.
Bench and Splash Back
Island Bench Overhang extends the back of the bench to accommodate seating.
Fixed Splashback Height can be set. Individual modules can override the height. A value of 0.0 will make the splash back extend to the underside of the wall cabinet.
Bench Depth can be changed but it's not recommended.

Kitchen Modules
Module array elements are slices or columns of the kitchen. The index appears as a number at the bottom of the base cabinet.Array elements can be copied or deleted from the right click menu. Click and hold the 6 dots in front of an Index to move the element to a new position.
| Width Overwrite | Width Overwrite allows to enter the exact width. Choose the closest match first. |
| Base / Wall / Top Cabinet | Choose a cabinet type. None will remove it. |
| Wall Cabinet Offset |
An Offset that will modify the cabinet size to match a mounted range hood or similar |
| Flip Door | Will move single door handles to the opposite side. |
| Crown | How the crown wrapes around at end modules or if the cabinet depth changes. |
| Splashback Height Override | The height of the splashback from the bench top for this module. A value of 0.0 will use the default height. |

Standard Appliances
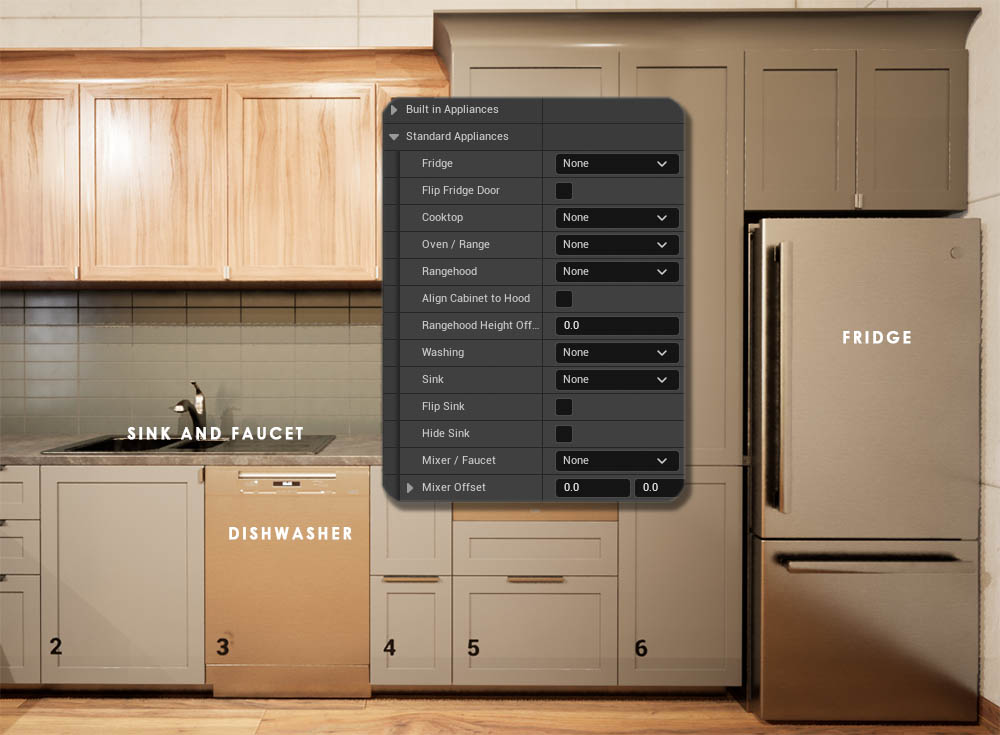
Appliances that are not being built into a cabinet are categorized to be easier to find.
More than one appliance can be selected.
| Flip Fridge Door | Will mirror the fridge mesh to have it opening to the opposite side |
| Align Cabinet to Hood | This will pull out the wall cabinet above the hood so the front alignes up with the rangehood's front |
| Rangehood Height Offset | Moves the rangehood up or down |
| Flip Sink | Mirrors the sink to move the drying pad to the opposite side |
| Hide Sink | Allows to have a cutout for a sink without placing the default sink. Add custom sinks in the <i>Custom Mesh</i> |
| Mixer Offset | Offset for the mixer to align with the sink |
Custom Mesh
Custom Mesh
Custom Meshes added for this module will be attached to it and will move with the module
This can be a replacement cabinet, as seen in the image, custom appliance, or additional items located on the bench or in a shelf.
| Mesh Domain | Defines the origin of the mesh. Where the new mesh is initially placed before the Transform is applied |
| Use Domain Material Material Domain |
Material domain as set in the Materials section and if this material is used instead of the default material of the mesh. |
| Custom Materials | Materials to overwrite the default materials of the mesh |
| Transform | To align the custom mesh. |

Kitchen Materials
Materials are separated between Base and Wall cabinets. Tall Cabs Use Base Materials will apply the base material to all cabinets or fronts that have the full depth (60cm or 24 inches).All cabinet and Kick board materials are based on the common 100 cm UV scale. Replacement materials can be found in the folders
- Materials Color - plain semi-gloss colors
- Materials Metal
- Materials Wood - wood types in horizontal or vertical direction
Bench Materials need to be World Tiling to avoid visible seams. They are in the folder
- Materials Stone - bench top materials
Splash backs are world aligned too and can use bench top materials or materials for tiles.
- Materials Stone - bench top materials
- Materials Tiles - tiles in various sizes
UV-Offset can be used to align the tiling to the current kitchen. The units are world units. A value of 5 will move the tiling 5 units.

Kitchen Custom Handles
Handles that are selected from the drop-down list in the Styles section are automatically aligned. Any offset in this section will be added to that alignment.
Reset Handle Offset resets all offsets to 0.0 so handles from the list are in the correct position.
Custom Handle Meshes can be added here and will be used if the style is set to Custom Handle Mesh. The Transform should align the handle with the other handles. The 0,0,0 origin is for:
- Door Handles - top left or right corner of the front
- Drawer Handles - center of the top edge
Offsets need to be applied after aligning the handles to the origins.

Kitchen Left Side
The Left Side of the kitchen is left of the first module.Add Left Side (Fridge) Panels will add decorative panels in the style of the doors.
Left Side Bench gives options for overhang of the bench or to add a bench in 90-degree angle.
Left Side Splashback has options for how the splash back ends on this side.

Kitchen Right Side (Corner)
The right side has the same options as the left side.Corners can only be added to the right side. There are two widths
- 62x62 cm Corner - no visible base cabinet
- 90x90 cm Corner - 30 cm visible doors base cabinet
Custom Meshes can be added to the corner module the same way as to standard modules.

Kitchen Right Side Wall Cabinet
Wall cabinets have 3 options
- Standard Cabinet. Width and style can be set the same way as for a normal module
- 90-degree Corner with 2 doors
- 45 + 45-degree Corner with 3 doors
Other settings are the same as they are for standard modules. Refer to the Kitchen Module section for more information.


 Top of page
 Lumen Documentation